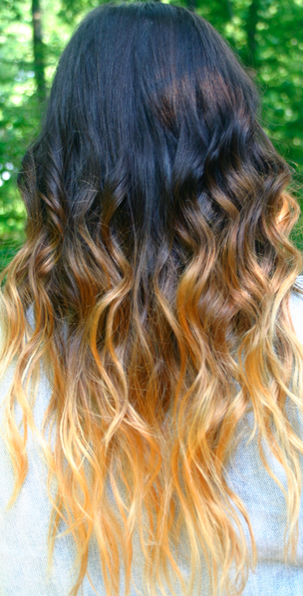
I've said it before, I'll say it again: I think of myself as beauty daredevil. And I think this post brings me one giant step closer to becoming the Evel Knievel of beauty (a prized and coveted title). It's pretty simple: I was bored, so I ombré'd my own hair (yes, that's now a verb). I think it actually turned out pretty close to the desired results - meaning my hair didn't all fall out - so I thought I'd share some how-to tips with you. To clarify, I have naturally dark brown hair that was virtually unprocessed and free from other dyes before I began. This tutorial explains how to go from dark hair to ombré, so if you have light hair, this is not the how-to for you!
But first, a DISCLAIMER: I am not a hair stylist or colorist and I have absolutely no experience or training doing this. I can't guarantee that these steps or products will work on your hair, all I can tell you is that they worked for me. If you're inspired to try this on your own hair, PLEASE make sure you follow all of the instructions on the hair color you use and you take into consideration your own hair type, past hair coloring/chemical processing on your hair and safety issues that go along with using the chemicals involved. In other words, follow these steps at your own risk!
You'll need:
-Two boxes of hair color (make sure it's a blonding product designed to strip color from hair). I used Clairol Born Blonde by Nice 'n Easy Maxi, knowing that it wouldn't actually lighten my dark hair to the very light shade shown on the box.
-An old t-shirt you don't mind getting bleach on (to wear during the process)
-Some old towels (to spread out on your work space and around you in case of any drips)
-A wide paint brush with stiff bristles you don't mind getting bleach on
Step-by-step instructions continued after the jump...
Step 1: THIS IS IMPORTANT. Read all of the instructions on the hair color kit.
Step 2: Decide what you want your ombré to look like (I pulled up images I liked on Google to use as a reference during the process).
Step 3: Do the strand test, as explained the the kit's instructions, to determine how long to leave the hair color on for desired results. If you don't do this, you really can't know how the color will affect your own hair and how long you should let it process.
Step 4: Mix the color according to the instructions.
Step 5: Wearing the gloves provided and working with dry, detangled hair, apply the color about mid-way up your hair (or however high up you want the first gradient of lighter color to start) using your fingers and the paint brush. Try to avoid a stark, even line at the top when you're applying the color, feathering it in a bit so it will ultimately look more natural. Make sure hair is totally saturated.
Step 6: Wait. Watch some TV or something.
Step 7: After the desired amount of time has passed, rinse out the hair color completely and blow dry your hair (or wait for it to air dry if you'd like to avoid putting your hair through further punishment). This is the first gradient.
Step 8: Mix the second box of color and apply it just to the ends of your hair, where you want the second gradient to start. The same rule about not creating a blunt line applies here. Even if you still have some color left over from the first round, the bleach only works for so long and then becomes less effective, so it's best to re-mix a new batch of dye. I also took this opportunity to add additional lighter pieces around my face with foil.
Step 9: Wait again.
Step 10: Once your hair has lightened to the desired shade, rinse the color out again.
Step 11: Condition the sh*t out of it. This process is tough on hair. Use a deep conditioner for color-treated hair (I like this one) in the shower and all sorts of moisturizing products once you get out (I like this and this).
The final step? Marvel at your trendiness and beauty know-how.
-S


